
Game systems
Loot, shops & inventory
Items get stronger with rarity and tier, loot and shops only offer what a hero can use, and an inventory decides which items fight and in what order.
Hub › Loot LabRarity and tier
 Common
 Uncommon
 Rare
Rare Epic
Epic Legendary
Every item copy a player owns is an ItemInstance: an item definition plus a rolled rarity (Common, Uncommon, Rare, Epic, Legendary) and a tier (1 to 5 by default).
The Item Rules asset (Create > AutoBattleKit > Item Rules) turns them into numbers:
| Rarity | Stat multiplier | Drop weight | Price multiplier |
|---|---|---|---|
| Common | 1.0 | 60 | 1.0 |
| Uncommon | 1.25 | 25 | 1.5 |
| Rare | 1.5 | 10 | 2.2 |
| Epic | 1.85 | 4 | 3.2 |
| Legendary | 2.3 | 1 | 5.0 |
Each tier above 1 adds statBonusPerTier (0.25) to that multiplier:
power = rarity multiplier x (1 + (tier - 1) x statBonusPerTier)
A 4-attack sword is 4 attack as Common tier 1, 5 as Uncommon, 9 as Rare tier 3 (4 x 1.5 x 1.5) and 18 as Legendary tier 5. Names, colors and every number are data, so rename "Epic" to "Heroic" or flatten the curve without code.
Leave the Item Rules field empty in Project Settings and the built-in defaults above apply.
Scaling base damage
Items have a kind (Sword, Axe, Wand, Staff, Shield, Ring...) and base stats (Attack, Armor, Health, Speed). Weapon damage is the Attack stat. Base stats are multiplied by the item's power, so rarity and tier raise damage automatically.
Abilities can scale too. Every Amount field has two extra options:
- Per tier: adds that much per item tier.
Gain 2 armor per tiergives 6 Armor at tier 3. - Scale with item power: multiplies the whole amount by the item's power.
Deal 4 damage (scaled)deals 9 on a Rare tier 3 item.
In code:
new DealDamage(TargetRef.Opponent, Amount.Scaled(4));
new GainArmor(TargetRef.Self, Amount.PerTier(0, 2));
Tooltips of rolled items show the resolved number ("deal 9 damage to the enemy"); the item inspector shows the generic form and a rarity x tier table of what the stats become.
Who can use what
Three layers decide whether a class can use an item, checked in this order.
1. The item's Class Access (on the item, under "Who can use it"):
| Class Access | Who can use it |
|---|---|
| Follow Class Rules (default) | Decided by the class rules and the shared pool below. |
| Any Class | Every class, whatever its rules say. |
| Only Listed Classes | Just the classes in Listed Classes. A Pilgrim's Maul for the Warden and the Monk only: the Berserker can't use it even though maces are normally fine for it. |
| Also Listed Classes | Classes whose rules allow it, plus the listed classes even if their rules say no. A tome for the casters and also the Monk. |
2. The shared pool (Item Rules > Shared Kinds, default Other, Ring, Amulet, Trinket, Potion): kinds every class can use without listing them. A class opts out of a shared kind by putting it in its Forbidden Kinds (a beast class that can't wear rings).
3. The class rules: forbidden kinds and forbidden tags always say no; then allowed kinds (empty = anything not forbidden) and allowed tags.
The Warden in the kit's content lists only its own gear (swords, axes, maces, spears, shields, armor, helmets) and forbids Wand, Staff and Tome. It still gets rings, amulets, trinkets and potions from the shared pool. Knights don't get wands: loot tables and shops with Respect class rules on never offer a Warden anything it can't use.
In code:
bool ok = warden.CanEquip(item, itemRules);
EquipCheck why = warden.Check(item, itemRules);   // why.reason: SharedKind, ListedOnItem, ForbiddenKind...
inventory.CanEquip = i => warden.CanEquip(i, itemRules);
Where to see it:
- Item inspector: "Who can use it" lists every class in the item's database with yes or no and the reason. Listed Classes only shows when the mode uses it.
- Class inspector: "Can use" shows its own gear, the shared kinds it gets, and every usable item grouped as class gear, shared pool, listed on the item, or any class.
- Hub > Loot Lab: pick a class to see what it can get from the table and why the rest is excluded.
- Hub > Content: items show a Shared, Any class, "Warden, Monk only" or "+ Monk" tag.
- Validation: flags an item locked to no class, a listed class that isn't in the database, and an item no class can use.
Loot tables
A Loot Table (Create > AutoBattleKit > Loot Table) rolls drops for a level:
| Field | What it does |
|---|---|
| Pool | Items that can drop. Empty uses the content database's items. |
| Odds by level | Rarity weights from a level onward (level 1: mostly Common; level 8+: Epic and Legendary appear). |
| Min / max drops, nothing chance | How many items one roll gives. |
| No duplicates | Never the same item twice in one roll. |
| Levels per tier, tier up chance | Tier grows with level, with a chance of one tier higher. |
| Kind weights | Make some kinds more or less common (more potions, fewer rings). |
| Respect class rules | Filter by the class passed to Roll. |
Each item also has a drop weight and can roll rarity. An item that can't roll rarity always drops at its own rarity, and only when that rarity is rolled. A fixed Legendary relic never shows up at level 1.
List<ItemInstance> drops = lootTable.Roll(level, seed, warden, database.items, itemRules);
Rolls are seeded. The same seed, level and class give the same drops.
Loot Lab
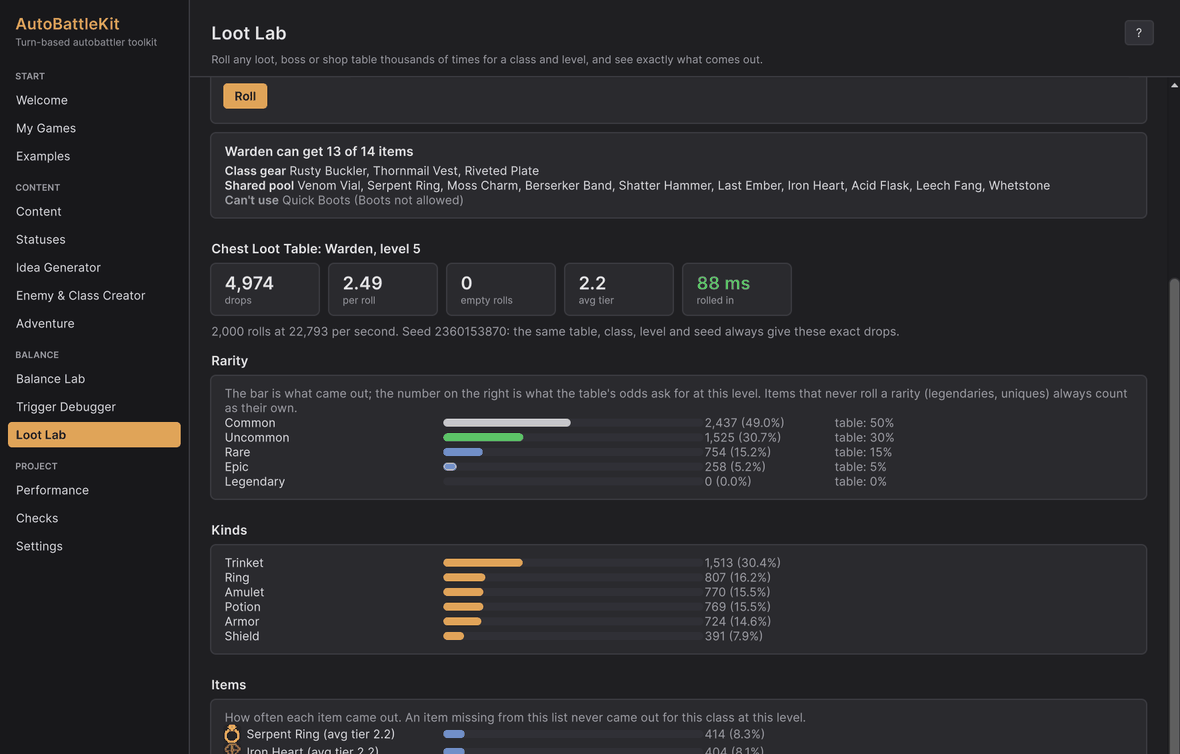
Hub > Loot Lab rolls a table thousands of times for a class and level, then shows what came out: the rarity split next to the odds the table asks for, item kinds, which items drop and how often, average tiers, prices for shops, and sample rolls. Use it to check odds before playing.
- Roll this table lists every loot table and shop table in the project. Use one table per source: New chest table, New boss drop table (one item per kill, from the items your bosses carry) and New shop table make them next to your game's content.
- Edit this table opens its pool, odds and drop counts on the page; change a number and roll again. Show in Project selects the asset.
- New seed every roll is on by default, so each press of Roll is a fresh sample. Untick it to keep the seed and get the same roll again, to compare before and after a change. The seed of the last roll is always shown.
- For a shop table the button reads Open the shops: it opens that many shops at the round you set and lists what the counters offer and what it costs.
Shops
The Shop Table uses the same pieces: rarity odds per round, roundsPerTier and tierUpChance, and respectClassRules. Prices come from Item Rules: base cost x rarity price multiplier x (1 + (tier - 1) x pricePerTier).
var shop = new Shop(shopTable, database.items, seed, itemRules, warden);
ItemInstance bought;
if (shop.TryBuy(0, out bought)) inventory.Equip(bought, slot);
shop.SellLoose(oldItem);   // sellPercent of its price
shop.NextRound(won);       // gold income, new offers, locked offers stay
Inventory: weapon slot, slots and backpack
An Inventory has three areas, and only the first two fight:
| Area | What goes there | Order in battle |
|---|---|---|
| Weapon slot | One weapon (Item Rules > Weapon Kinds: Sword, Axe, Mace, Dagger, Spear, Bow, Wand, Staff, Scythe) | First |
| Equipped slots | Everything else (unlockable, numbered) | Left to right, after the weapon |
| Backpack | Anything, even items the class can't use (to sell later); same size and look as a slot row | Never |
A class sets its shape: Weapon Slot (on by default), Slots, Backpack Slots (8). myClass.CreateInventory(itemRules, extraSlots) builds a matching inventory with the class's equip rules and weapon kinds. With a weapon slot, weapons go only there (turn WeaponsOnlyInWeaponSlot off to allow spares in regular slots).
Every slot is a SlotRef: SlotRef.Weapon, SlotRef.Equipped(2), SlotRef.Backpack(5).
var inv = warden.CreateInventory(itemRules, extraSlots: 2);
inv.EquipFirstFree(sword);                              // weapon slot; other items take the first free slot
inv.Swap(SlotRef.Backpack(0), SlotRef.Weapon);          // move or swap anywhere, if both items are allowed
PlaceProblem why = inv.WhyNot(wand, SlotRef.Weapon);    // ClassCantUse, WeaponGoesInWeaponSlot, Locked...
inv.Equip(newItem, SlotRef.Equipped(1));                // what was there moves to the backpack (refused if full)
inv.Replace(newItem, 1, out var old);                   // or hand it back to sell or discard
database.RunBattle(warden, inv.Loadout(), enemy, rules, seed, itemRules);   // weapon first, never the backpack
EquippedStats(rules) sums the scaled stats of what fights. Save and load keep the weapon, the slots and backpack positions, with each item's rarity and tier.
The demos' inventory bar shows the weapon slot, the slots (or the grid) and a Backpack tile (or press B) that opens a panel of the same tiles. Click an item, then a slot, or drag it; a refused move says why.
Backpack grid
Instead of numbered slots, a class can have a Grid (Backpack Battles style). Set Grid on the class to 4 x 3, say, and its equipped area becomes 12 cells. Items then have a Shape: Auto gives weapons and staffs a tall 1 x 2, shields and armor a 2 x 2 square, and everything else one cell; pick Wide, Line3 or L on the item to change it. Items turn in quarter steps (press R in the demos) and can't overlap or leave the grid.
Items that share an edge are neighbours. Give an item an ability with an Items > Next To Item condition and it fires only while the item touches one with that tag (or one specific item: id:venom_vial): "Turn start (if next to a venom item): give the enemy 1 Poison". The Loot sample's Viper Ring does exactly that. Neighbours are worked out when the battle is built from the loadout; in a slot inventory the condition never passes.
var inv = alchemist.CreateInventory(itemRules);   // alchemist.grid = (4, 3)
inv.PlaceAt(ring, 0, 0, rotation: 0);              // anchor cell (top-left of its cells) and quarter turns
inv.EquipAt(sword, 1, 0, rotation: 1);             // whatever covered (1, 0) moves to the backpack
inv.Rotate(sword);                                 // a quarter turn, if it still fits
inv.Neighbours(ring);                              // the items touching it
inv.Loadout();                                     // weapon first, then top row to bottom, left to right
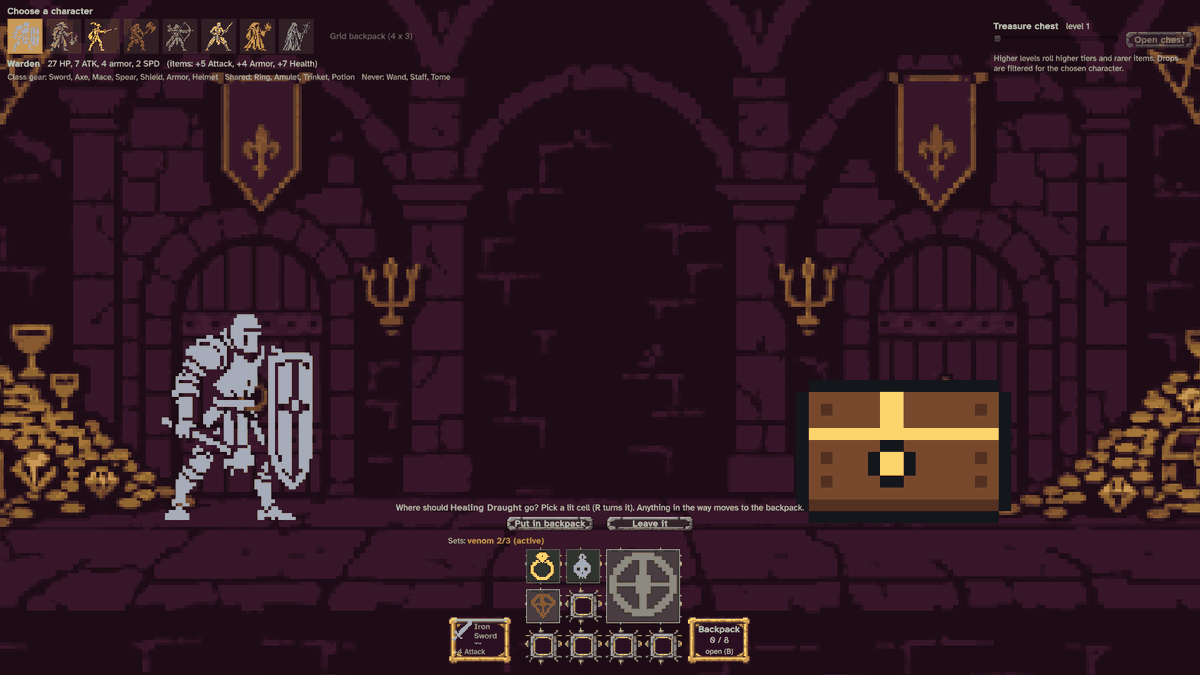
SlotRef.Equipped(i) addresses cell i = y * width + x, so every slot method (Equip, Swap, WhyNot...) works on a grid too: the cell is the item's anchor. In the Loot Drop and Shop demos, tick Grid backpack in the character bar to try it: cells light where the item fits, a green or red ghost shows its shape under the mouse, and touching items get a green edge. Saves keep each item's cell and rotation.
Item sets
A set is a shared tag plus bonuses that count it. Tag the items ("venom"), then give any of them an ability with an Item Tag Count condition: "Battle start (if you own 2+ venom items): give the enemy 2 Poison". Several thresholds work (2 and 3, say), and every copy of an item counts.
Only items that fight count: the weapon and the equipped slots, never the backpack, and never the enemy's items. inventory.Sets() lists every set the inventory touches with how many count and the next threshold, for a display like "venom 2/3"; the demos show it above the slot bar. The kit's content has a venom set: Stiletto, Plague Skull and Viper Ring.
The demo scenes
- Loot Drop.unity: pick a character, set a level, open the chest. Drops fly out with a glow in their rarity color. Take sends one to the character (glow, hop, sparkles, sound), then you pick the weapon slot, an empty slot, a full one (its item moves to the backpack), the backpack, or leave it.
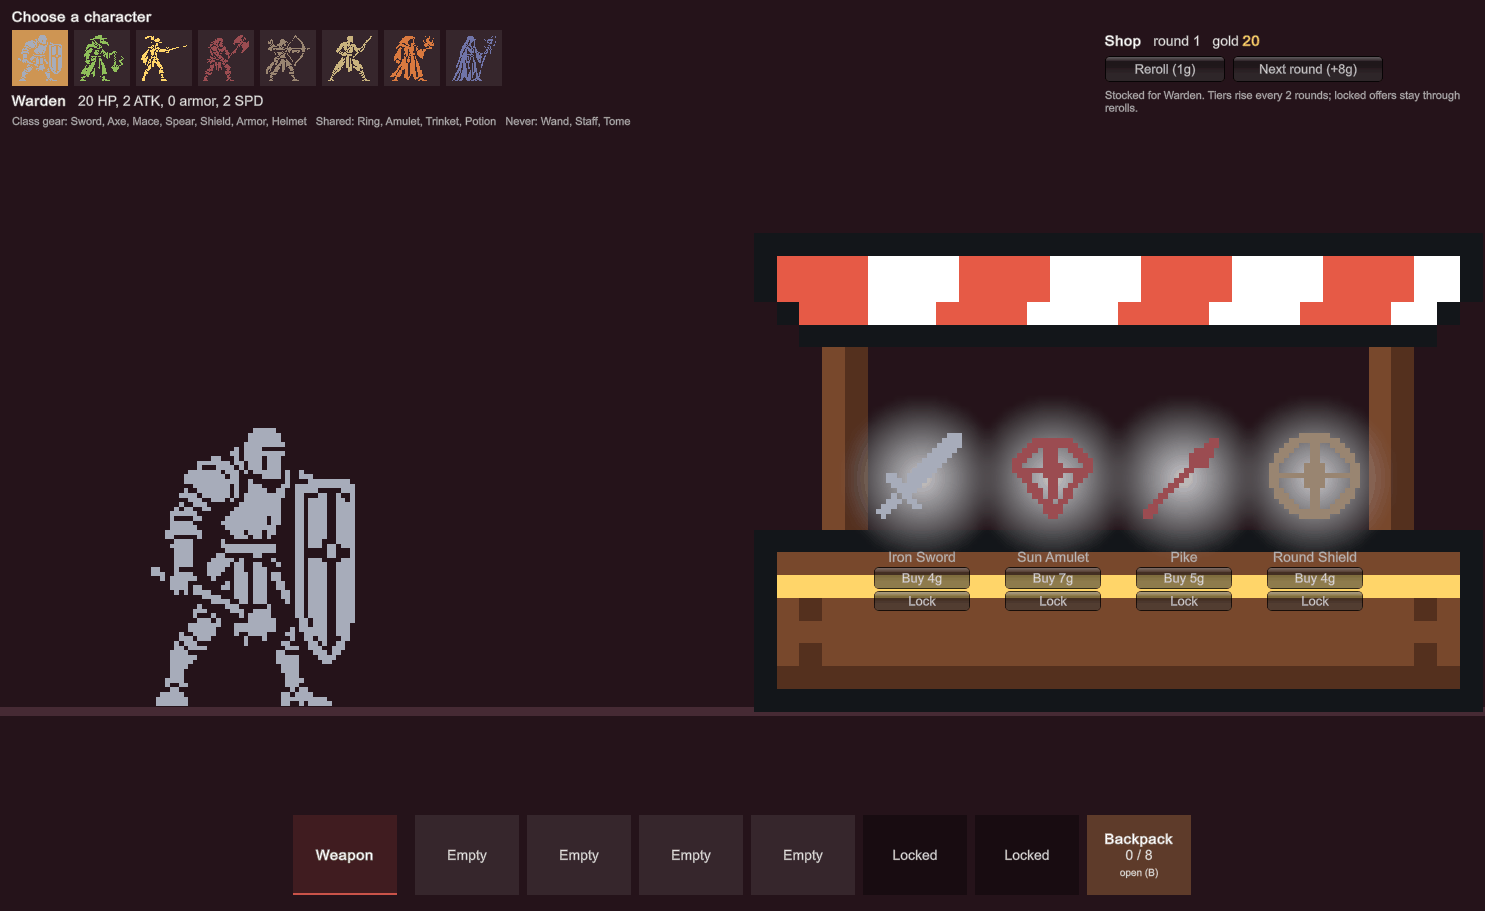
- Shop.unity: each character has a stall stocked for their class. Buy, lock, reroll and advance rounds. Replacing a full slot moves the old item to the backpack (or sells it when the backpack is full). Select an item in your inventory to sell it.
Both share LootShopStage.cs. Copy it as the start of your own reward screen. Scripts and controller buttons can drive it without a mouse: Receive(item) or Receive(items) (several drops fly in one after another), Pending (the item waiting for a slot), PlacePending(slot), AutoPlace() (first free slot, else the backpack) and ClearToast(). The 02 Adventure demo builds a whole run on the same pieces (see Adventures).