
Make content
Content & folders
Heroes, enemies, bosses, items and statuses are asset files. Each one has a folder with its art, colour variants and, for fighters, a prefab you can drag into a scene.
Hub › ContentGive it a power
Select a hero, enemy, item or status on Hub › Content (or in the Creator) and the Give it a power card builds an ability from three dropdowns: When (on hit, turn start, before you would die...), Only if (once per battle, every Nth turn, below N% health...), and Do (deal damage, give a status, gain armor, survive at 1...). The sentence under the dropdowns is exactly what players read; Add puts it on the asset. The Cookbook lists twenty ready-made combinations.
Sprite frames (optional)
A fighter needs one sprite; the kit animates it (float, lunge, hit flash, death) without animation clips, and that is how every fighter in the pack works. If you have a sprite sheet of your own, a fighter can also carry Frames in the Inspector: extra idle poses that cycle, an Attack pose shown while lunging, and a Hurt pose shown while hit. Poses must share one canvas size with the main sprite or the fighter will pop between them; leave Frames empty otherwise.
Five kinds of content
| Kind | What it is | |
|---|---|---|
 |
Class (hero) | Stats, passive abilities and starting items, plus what it may equip and how many slots it has. |
 |
Enemy | The same as a class, with a tier: Normal, Elite or Boss. |
 |
Boss | A boss-tier enemy, kept in its own Bosses folder. |
 |
Item | Abilities for whoever holds it, plus kind, base stats, rarity, cost, tier and tags for sets. |
 |
Status | Stacks on a fighter (poison, regen, thorns). Its abilities scale with the stack count. |
A Content Database lists the content one game uses. The Hub works with one database at a time, chosen on its Welcome page.
One folder each
The kit's own content is in AutoBattleKit/Content. Your game's content goes in your own folder; New game on the Hub's Welcome page copies an example's content to Assets/<your name>/Content to start from.
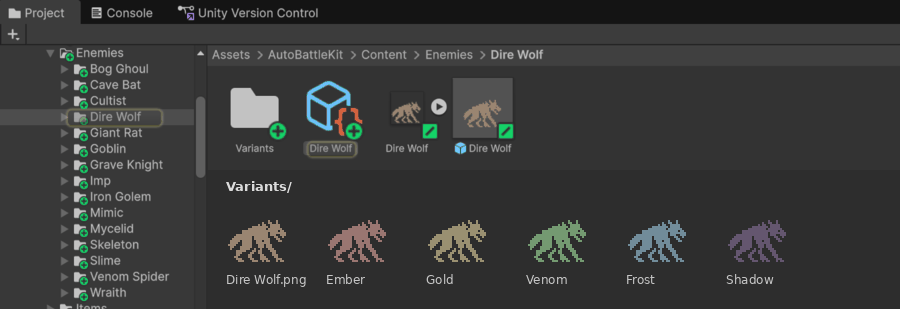
Make one
Pick whichever is closest to hand. They all make the same folder.
- Project window: right-click a folder, Create › AutoBattleKit › Item / Class / Enemy / Boss / Status, type a name. Made inside your database's folder, it's added to the database too.
- Hub > Welcome: New hero, New enemy, New boss, New item, New status.
- Hub > Content: the New button above each list; Duplicate copies one with its own art and prefab.
- Hub > Enemy & Class Creator: drag in sprites and get one fighter per image. See Creator & ideas.
Every new one gets placeholder art straight away: a small pixel creature for fighters, a gem for items, and for statuses the matching icon from the status library (or an orb in the status colour).
Edit it in the Inspector
Click the asset. The Inspector shows its fields, a What it does box with every ability in plain English, and a Files box at the bottom.
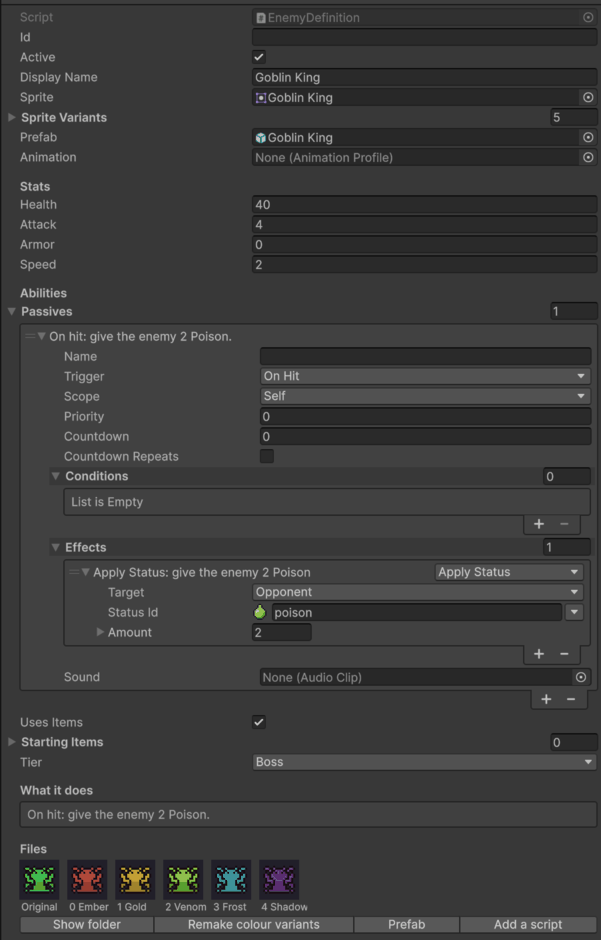
The Files box has:
- the art and its five colour variants side by side,
- Show folder, to find it in the Project window,
- Remake colour variants, after you repaint the art,
- Prefab (or Make prefab) for classes, enemies and bosses,
- Add a script (or Open script). See Custom blocks & scripts.
Items also show who can use them and a table of their stats at every rarity and tier. Classes show everything they can equip.
Items
An item's abilities belong to whoever holds it. To give a hero an item from the start, add it to the hero's Starting Items. Enemies carry items the same way (untick Uses Items to test one without its gear).
Create the item
Create › AutoBattleKit › Item in
Content/Items, name it Venom Vial.Give it an ability
Abilities > +, Trigger On Hit, Effects > + > Status › Apply Status: Opponent, poison, 2. Add a Chance condition of 30 if you like: On hit (30% chance): give the enemy 2 Poison.

Hand it to a hero
Open a hero, add the vial to Starting Items, and press Play in your battle scene.
More on triggers, conditions and effects: Abilities. Rarity, tiers, loot and shops: Loot, shops & inventory.
Art and colours
- Your own art: paint over
<Name>.png(keep the file so references stay), or set the Sprite / Icon field to any sprite. The next Remake colour variants copies it into the folder, and if you repainted at a new size it keeps the fighter one unit tall. PNGs in these folders import as pixel art automatically: point filtering, no compression, one unit tall. - Colour variants: every entity gets the same five, in the same order, so variant 3 is Frost for every enemy.
 Original
 0 Ember
 1 Gold
 2 Venom
 3 Frost
 4 Shadow
Colours keep their shading and the dark outline stays. Repaint any variant PNG freely. In code, enemy.SpriteFor(3) and item.IconFor(3) return a variant, and -1 gives the original.
Prefabs
A fighter's prefab has a SpriteRenderer, the procedural animator and a Fighter View that points at the asset. Drag it into a scene to place the fighter. On the Fighter View, Colour picks the original or a variant by name and Face Left flips it. Stats and abilities stay on the asset, so a prefab always matches its fighter.
// spawn any fighter, in its Frost colours, facing left
FighterView view = FighterView.Spawn(enemyDefinition, new Vector3(3, 0, 0), parent, variant: 3, faceLeft: true);
The Content page
Hub › Content lists everything in the active database with its plain-English text, rarity, cost and any problems, and edits the selected one in place.
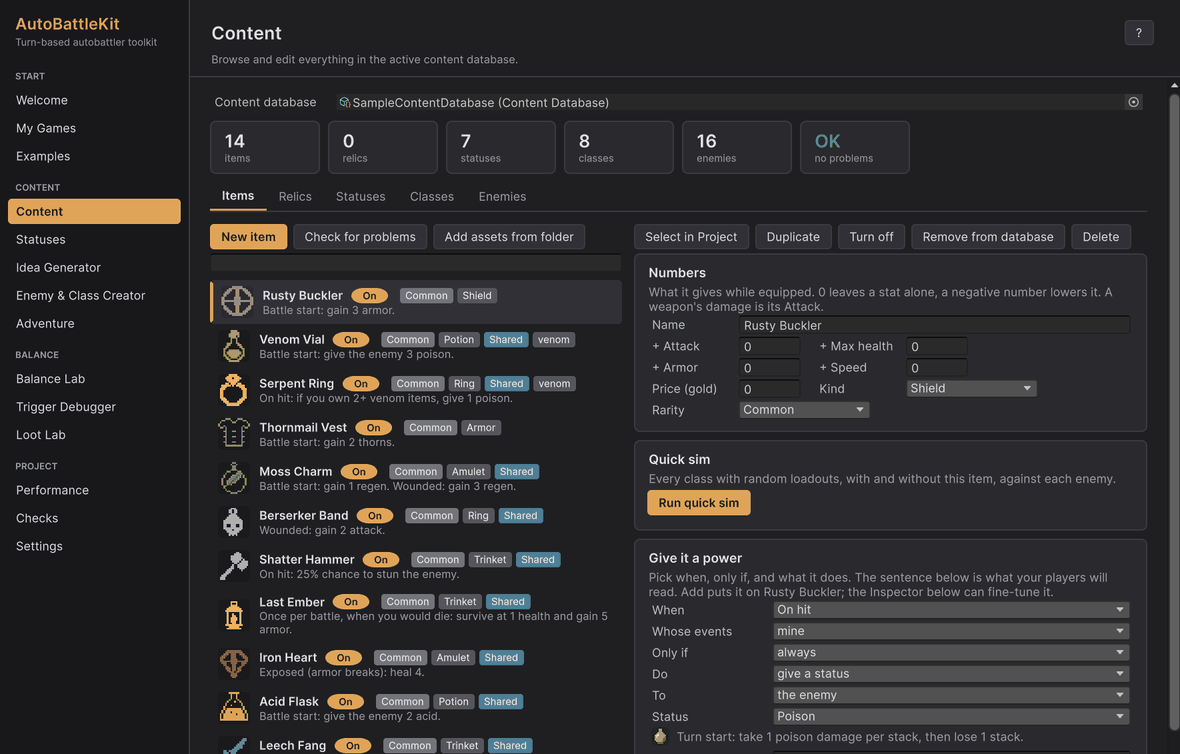
- Numbers is the first card for an item or a fighter. For an item: Name, + Attack (a weapon's damage), + Max health, + Armor, + Speed, Price, Kind and Rarity. 0 leaves a stat alone and a negative number lowers it (a heavy axe with -1 Speed). For a fighter: Health, Attack, Armor, Speed and Tier. The Inspector below has the same fields and everything else.
- Backpack shape on an item only matters in a grid backpack: it is the cells the item covers, drawn next to the field. Leave it on Auto unless your heroes have a Grid size.
- Check for problems finds missing status ids, empty slots, blocks on the wrong trigger and content that uses a turned-off status.
- On / Off on every row: turned-off content stays in the project but is left out of battles, simulations, loot, shops and encounters.
- Add assets from folder lists content saved next to the database that isn't in it yet.
- Remove from database unlists an asset and keeps the file. Delete moves it to your system's trash after asking.
Older content
Content made before folders existed, or dropped in from elsewhere, moves into its own folder with right-click > AutoBattleKit › Put In Its Own Folder, or all at once with Tools › AutoBattleKit › Content › Put All Content In Own Folders. Moving keeps every reference working.
Tooltips in your game
Tooltips.Item(item) returns rich text such as Venom Vial (Rare) · 5 gold, then one line per ability. Tooltips.Status and Tooltips.Unit do the same for statuses and fighters. All wording lives in TextTemplates, so you can reword or translate it at startup.